Simple Meter: Dots and Mild Syncopation
“Dotted rhythms” in simple meter are also extremely common. It is typically more common to have the longer (dotted) note fall on the beat and the short note fall right before the next beat (cells S5 and S6 below), but the other way around—the short note on the beat and the longer note off the beat (cells S7 and S8)—is also common in certain styles.
These dotted rhythms are common at different levels of scale. For example, the dotted note could be shorter than a beat (three-quarters of a beat long, followed by a note one-quarter of a beat long) or longer than a beat (a note a beat and a half long, followed by a note a half beat long). To distinguish these, make sure you are carefully tracking the beat, ideally with some kind of physical motion like swaying or conducting. In the takadimi and number rows of the table below, notes that last past the start of the next beat have additional syllables in square brackets: these should be kept track of silently while sustaining the previous note.
Once we get to compound meter, we’ll also need to distinguish these “long-short” and “short-long” rhythms from compound-meter versions of those same patterns.
Any of the notes in the cells below may be replaced by rests. When this occurs, we simply need to experience the rest as a (silent) part of the pattern.
| Reference number: | S5 | S6 | S7 | S8 |
|---|---|---|---|---|
| Description: | long-short within a simple beat | long-short across two simple beats | short-long within a simple beat | short-long across two simple beats |
| Staff notation (eighth note beat): | ||||
| Staff notation (quarter note beat): | ||||
| Staff notation (half note beat): | ||||
| Takadimi syllables: | ta mi | ta [di ta] di | ta ka | ta di [ta di] |
| Number syllables: | 1 a | 1 [and 2] and | 1 ee | 1 and [2 and] |
| Kodaly syllables: | ||||
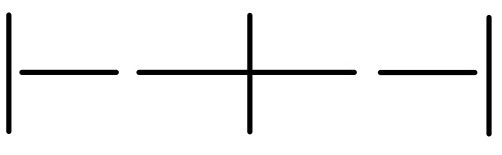
| Protonotation: | 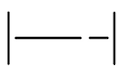 |
 |
 |
There is also a mildly syncopated rhythm that is reasonably common within simple meter. We will work with longer syncopated rhythms in a later section.
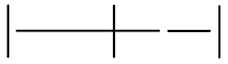
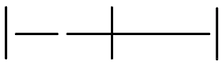
| Reference number: | S9 | S10 |
|---|---|---|
| Description: | short-long-short within a beat | short-long-short across two beats |
| Staff notation (eighth note beat): |  or or |
|
| Staff notation (quarter note beat): |  or or |
|
| Staff notation (half note beat): | ||
| Takadimi syllables: | ta ka di | ta di [ta] di |
| Number syllables: | 1 ee a | 1 and [2] and |
| Kodaly syllables: | ||
| Protonotation: | 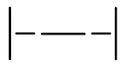 |
 |
Activity: Improvise and identify rhythms
Goal: Generate or identify the defined rhythmic cells.
Before you start: This activity works best with at least one other person. But you can also do it on your own; just skip step 3.
Instructions:
- Identify one person to improvise.
- The improviser comes up with and performs a short rhythm (perhaps 4–6 beats long) made up entirely of the rhythmic cells defined above, cells defined in the previous section, and optionally notes longer than a beat.
- The other student(s) identifies/identify which cells were used and in what order.
If this activity feels too easy, go ahead and add pitches at an appropriate difficulty level to the improvised rhythm.
Activity: Read rhythmic cells
Goal: Notice when rhythmic cells occur in notated music.
Before you start: You’ll need a source of notated melodies or rhythms that primarily use the rhythmic cells listed above. Sight-reading anthologies are a good source and often have chapters dedicated to dotted rhythms; Open Music Theory also has appropriate materials here. You can do this activity vocally or on another instrument.
Instructions:
- Look over the notation, note the meter, and set up an appropriate sense of meter internally.
- Scan over the notation, identifying rhythmic cells. Note that some notes in the rhythmic cells may be replaced by rests; you can still call up the “sense” of the rhythmic cell, simply experiencing the silence as part of the pattern.
- Perform the rhythm, with or without pitch.
Activity: Find rhythmic cells “in the wild”
Goal: Develop sensitivity to rhythmic patterns as they occur in music.
Instructions:
Note: using “Simple” mode in Brian Edward Jarvis’s Rhythmic Pattern Dictation Trainer is a useful preparatory exercise or substitute when feedback is needed but no one is around to give it.
- Listen to a song from the playlist below and determine its meter.
- Listen to the first 1–2 phrases of the song and identify the rhythmic cells used and their order.
- Optionally, identify an appropriate meter, time signature, and durational symbols that represent the music.
Activity: “Point and Perform” in a Group
Goal: Perform indicated rhythmic cells
Before you start: This is a group activity
Instructions:
- Identify a leader. This person will display the defined rhythmic cells in a way that everyone else can see, such as in notation or protonotation on a board.
- The leader sets up a steady beat, perhaps by conducting, and everyone else aligns themselves with that beat.
- Once everyone is ready, the leader points at rhythmic cells and the other participants perform them on rhythmic solfège, on “ta,” or by clapping or tapping. The leader should start by changing slowly, allowing the other participants to settle into each cell by performing it a few times in a row; as people get more comfortable, the pace of change can speed up until you are changing every beat.
Activity: Improvise rhythmic cells while listening to music
Goal: Use defined rhythmic cells to improvise to a piece of music.
Instructions:
- Start one of the songs in the playlist below.
- Pick a rhythmic cell listed above and perform it to the beat of the song playing
- As you perform the rhythmic cell, listen for where significant changes seem to happen in the music. At these points, change to a new rhythmic cell! If you feel like you aren’t able to hear these points of change while performing the rhythm, that’s ok (we’ll work on listening for form later)—just change when it feels appropriate to you.
- Continue to switch patterns until you feel comfortable with each of the cells.
- If you feel pretty comfortable with the rhythmic cells, you might start performing them one after another or even jumping between them randomly instead of repeating one over and over.
Image Attributions |
|
