60 Canvas Basics
This page explains some of the basics of Canvas: how it works and how to navigate it.
How OTL Uses Canvas
The Office of Teaching and Learning uses Canvas to build courses for UVU. There are different types of courses.
- DEV Shells: A development course, or DEV shell, is where the Instructional Designer works with the faculty to build a course before it goes live. The designer ensures that the DEV shell fits with the OTL template and the elements of a great course are incorporated. This is done by meeting regularly with the professor and developing a Course Design Plan.
- ODS Shells: An Ongoing Development Shell, or ODS, is used for faculty who want to update a copy of their courses in a Canvas shell without students enrolled. An ODS course provides a place faculty can capture updates as the course is taught without affecting students within a current course offering.
Parts of Canvas
- Canvas has navigation on the left side of the screen. Go to your ‘Dashboard’ by clicking this button:

There you’ll see the courses you’re working on as thumbnails. - Inside courses you’ll see the course navigation on the left side of the screen as well that will look something like this:

You can customize this if you scroll down to and select ‘Settings’ and then click on the ‘Navigation’ tab. On the top part of the page you’ll see what is currently in the navigation, and if you scroll down you’ll see options that are not currently in the course navigation. You can click and drag these options to put them in the course navigation or remove them.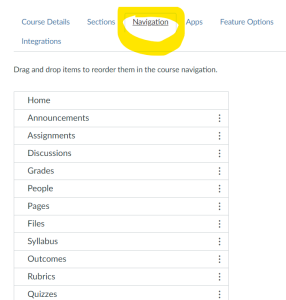
Where to find ‘Navigation’ tab under settings 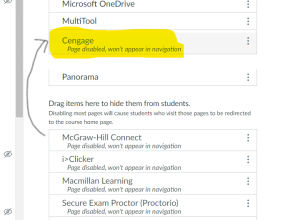
example of clicking and dragging 3. Here are the functions of some of the Navigation options:
- Home: This is the first thing you see when you open a course. The default option is to take you to the modules. You can also create a homepage.
- Modules: This is where you go to organize a course into units / modules. Here you can create a module and add elements like headers, pages, quizzes, and assignments so students can see what they need to complete in a given module.
- Announcements: This is where the instructor in a course can add announcements about the course.
- Assignments: This will take you to a list of all the quizzes and assignments in a course. Here you can organize them into groups.
- Discussions: This is a place to create and view discussions, where students can post a response to a prompt.
- People: This is where you go to add professors and other designers to a course.
- Pages: This shows you all the pages in a course.
- Files: This is where you’ll find everything that is uploaded to a course. Any documents, images, video files should be organized and checked for accessibility (see Panorama below).
- Rubrics: This is where you can see and create a rubric for an assignment or a discussion. Once the rubric is created it can be attached to an assignment so the students can see what they’ll be graded on, and the instructor can use the rubric to grade student submissions.
How to Use Design Tools
When you edit a page in Canvas, you can use a sidebar called ‘CIDI Design Tools’ to help you edit a page. The Design Tools sidebar includes UVU template elements like boxes on Overview Pages and content for Read and Watch pages. Design Tools helps you quickly insert any element you need onto the page you’re working on.
See the CIDI Design Tools chapter for more information.
Editor Prompts
OTL’s template contains callout prompts with instructions on how to modify the page.
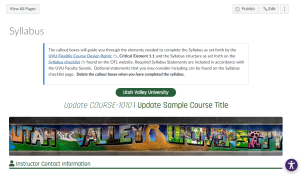
Once the instructions are followed these callout boxes can be deleted; they are not meant to be a part of the finished course.
Creating Modules
To add a module in Canvas, go to the ‘Modules’ page.
Click on the box that says ‘+Module’ to add a new module.
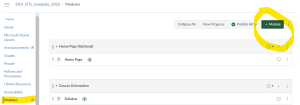
Once the module has been created, you can add content by clicking on the ‘+’ icon to the right of the module name. From there you can select what type of content (page, assignment, quiz, etc.) to include in that module. You can use one that has already been created, or create a new item from this menu. Keep in mind, you will need to apply the template to any new items you create.
If you need to build multiple modules, consider using the Multi Tool (below).
Creating Assignments
You can create an assignment by adding it to a module (as described above in ‘Modules’).
Alternately, you can go to the ‘Assignments’ section in your Canvas course.
If you’ve imported the OTL template into your course, you should already see Assignments listed in the navigation menue. These assignments already have the OTL template applied. You can copy these assignments to preserve the template elements as you create new assignments.
To copy an assignment, click on the three dots to the right of the item you would like to duplicate and select ‘Duplicate.’
You can duplicate assignments in bulk by using the Multi Tool (see instructions below).
Creating Rubrics
When you create an assignment or discussion, you can add a rubric. These rubrics are visible to students so they know what they will be graded on when they are submitting an assignment. They are also useful for instructors when grading an assignment because the rubric will appear in Speedgrader.
You can create a rubric from the ‘Rubric’ section in your course navigation, or you can create it directly on an assignment page. Look for the ‘+ Rubric’ button at the bottom of the assignment page.
To create a rubric, list the criteria used to grade the assignment and describe what is needed to achieve different points in each category.
If you created a rubric in the ‘Rubrics’ section, you can attach it to a specific assignment by using the ‘+ Rubric’ and then clicking on the ‘Find a Rubric’ link. This will lead you to a window where you can search courses and rubrics to add.
NOTE: If you add a pre-existing rubric that is attached to more than one assignment, you cannot edit that rubric for all the assignments at once. If you make edits to a rubric that is attached to multiple assignments, it will create a new rubric specific to the assignment where you are editing that rubric.
Navigation
Each course needs to have certain features visible in the navigation so the students can navigate to the sections they need to complete a course. The navigation is on the left-hand side of the screen when you are inside a Canvas course. If a page has an icon with an eye crossed out, it means that page will not be visible to the students.

Example Canvas Standard Navigation
OTL’s standard visible Canvas navigation options follow and should be listed in this order:
- Home
- Microsoft Teams Classes (if used)
- Modules (if “Home” is NOT set to modules view)
- Announcements
- Grades
- People
- My Media (if used)
- Library Resources
- Panorama
- Course Evaluations
We want to encourage student to navigate the course through the “Modules” view or the “Home” option set to modules.
You may add more to the navigation menu as needed. To do so, go to ‘Settings’ to change the visibility of a section. See the ‘Parts of Canvas’ section above.
Basic HTML
When you are editing a page, you usually work in the ‘Rich Text Editor’, but there might be some instances where you want to access the coding. To do that, click on the HTML icon in the bottom left of the window:

Once you are in HTML you can see more details about how the page is formatted and why it’s behaving the way it’s behaving. Understanding basic HTML will help you fix many issues you might encounter in Canvas. Review basic HTML tips for Canvas as needed.
Embedding a Video
When you would like to include a video on a page, you will need to embed that video. If you include just the link to a video, users will have to go to a different page to view the resource. But when you ’embed’ something on your page, users will not have to leave your course to access the video or other file you’re embedding.
If the video is located on Kaltura, select the ‘Apps’ icon in your rich text editor.
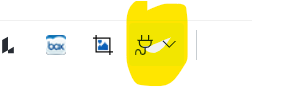
From there you can find Kaltura and the video that you are looking for.
NOTE: All the videos you include in your course should have closed captions.
If you are embedding a video or other file, you will need the embed code.
To find the embed code for a YouTube video, navigate to the YouTube video. Select the ‘Share’ icon and click on the ‘Embed’ icon.
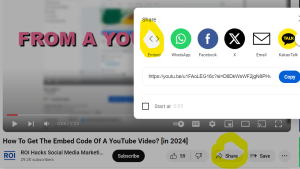
There you will find the embed code. It will look something like this:
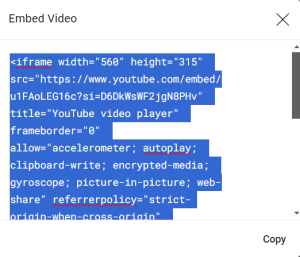
Copy the embed code to your clipboard. Then go to the page in Canvas where you would like to embed the video.
Edit the page using the rich content editor.
Make sure the cursor is on the spot where you would like the video to be.
Select the embed icon (you may need to click the three dots for more options in the rich text editor). A box will pop up where you can paste the code you just copied.
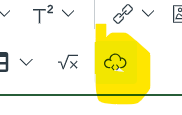
Once you insert the code, the video will be embedded on the page.
Inserting Pictures
When you insert a picture on a Canvas page, the file is automatically uploaded in the ‘Files’ section of the course.
When you insert a picture, make sure that:
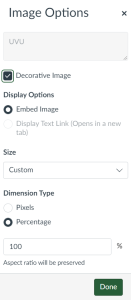
- You have alt text (or the image is marked as decorative).
- The sizing is a percentage, so it adjusts as the size of the screen adjusts.
To add alt text, after you upload an image, click on the image and select ‘Image options.’ A toolbar will pop up on the right of the screen where you can add alternate text to the image. You can also choose to mark the image as ‘decorative’ if it doesn’t enhance understanding of the content on the page.
To adjust the sizing, look towards the bottom of the toolbar. You’ll see an option to size it based on percentage instead of pixels. You may choose to keep the pixels, or, if you would like the image to adjust as the size of the page changes, you can select percentage and then choose a percentage of the page that you would like the image to fill.
Course Banners
OTL’s course template comes with banners for the course. The template includes a banner for the home page, a banner for the syllabus, and banners for each of the overview pages. Banners are images that sit on the top of the page. You may choose to customize banners for a course so the image relates better to the course content. If you create your own banners, use the following sizes for each page:
Home Page: 360 px by 1200 px
Overview and Syllabus Pages: 171 px by 1200 px
You can find banner templates that you can build in Adobe Photoshop in IDA’s SharePoint ‘Course Development Docs’ folder.
You can also find other options for banner images in ‘Design Tools’ above.
Validating Links
When you add hyperlinks to your course, you want to make sure the links work. You can scan your entire course for links with the ‘Link Validator’ tool in Canvas. Once you identify links that are broken, you can work with the professor to replace or remove links that won’t work for the students.
TidyUp
TidyUp is a tool you can use in Canvas to check whether there are unused files in your course. Run TidyUP before you submit a course for quality review. TidyUp will scan your course and tell you which files are being used and where they’re being used. It will also tell you if there are files that aren’t attached to any pages or assignments so you can remove those from your course. For more information, review how to use TidyUp.
Multi Tool
The Multi Tool can help you build content more easily in Canvas. It lets you copy content from a module that you’ve already created into new modules. This is helpful when you’re working with a professor and you’ve decided on the content and assignments you want the students to read and do in each module. For a tutorial, watch How to Build Courses with the Multi Tool.
Keep in mind that it’s much easier to apply the template (add the UVU title, headings, boxes, content types needed for each page) before duplicating pages using the Multi Tool.
Panorama / Accessibility Checker
Panorama is the accessibility checker we use at UVU. When content is added to a Canvas page, Panorama will check how accessible that content is. It will check for things like alternate text for images and headings that a screen reader can recognize and use to deliver information on a page correctly. Learn more about what goes into accessibility by reviewing the Introduction to Accessibility. You can review how Panorama works in the Panorama chapter.
Once you know what is wrong on a page you can work to fix the issue. If the image needs a description, review ‘Inserting Pictures’ (above) to see how to add alternate text.
If the page doesn’t have the correct order of headers, check to make sure the first header on the page is ‘Heading 2’ (Heading 1 is automatically set by the page title). Make sure the headings underneath the first one follow the right order (3, 4, 5 etc. or go back to 2 for a new main heading).
If the issue is with a file or document attached to the page, Canvas can help you fix quick issues or you can submit the file to the remediation team. For instructions on submitting files for remediation, see Requesting Course Accessibility Remediation.
